Azure
Azure
One of the providers supported by SSMCM is Microsoft Azure. To integrate Azure subscriptions, the following steps must be followed:
- Integrate the "SSMCM Inventory" application into the Azure directory
- Creating a custom role
- Permissions on subscriptions
It is also possible to perform all these steps by running a small code.
Step 1: Integrate your application into your Azure directory
-
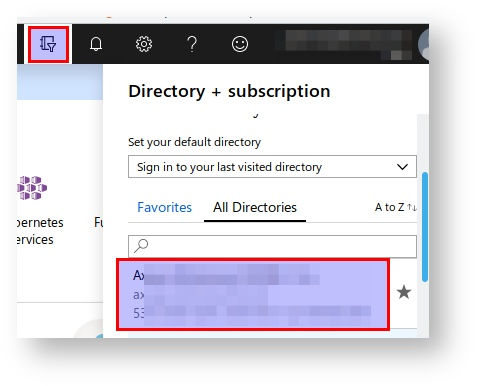
Visit URL https://login.microsoftonline.com/TENANT_DOMAIN.onmicrosoft.com/adminconsent?client_id=2f734312-2ccf-4c27-8658-c4a1bb937ef1&state=468466576&redirect_uri=http://localhost:3000 (replacing TENANT_DOMAIN with the corresponding domain) using a user with administrator permissions in the directory; This domain data can be viewed in the directory picker at the top right of the Azure portal:
-
Azure will ask if you want to allow access to the application; Accept it.
-
You will be redirected to http://localhost:3000, that will give error. This is normal, although permissions will have been granted successfully.
Step 2: Create a role to power off/on
In order for SSMCM to power cycle machines, it is necessary to create a custom role with only the necessary actions (there are other predefined roles that can perform this, but they also allow you to perform more actions, so for security, we will create a custom role with only the strictly necessary actions).
The role is created at the directory level (common to all subscriptions), but that role must contain all the subscriptions on which you want to give permissions in the field AssignableScopes.
To do this, we will execute the following commands from a Powershell console, or from the "Cloud Shell" of the Azure portal:
Info
This process can only be done by command line.
# Obtain the main service of SSMCM application
$compassApplicationId = "2f734312-2ccf-4c27-8658-c4a1bb937ef1"
$compassInventoryServicePrincipal = Get-AzADServicePrincipal -ApplicationId $compassApplicationId
if (!$compassInventoryServicePrincipal) {
    New-AzADServicePrincipal -ApplicationId $compassApplicationId
    $compassInventoryServicePrincipal = Get-AzADServicePrincipal -ApplicationId $compassApplicationId
}

# Obtain subscription list
$subscriptions = Get-AzSubscription

# Obtain or create the role "Virtual Machine Operator".
$role = Get-AzRoleDefinition "Virtual Machine Operator"
$new = $false
if (!$role) {
    $new = $true
    $role = [Microsoft.Azure.Commands.Resources.Models.Authorization.PSRoleDefinition]::new()
    $role.Id = $null
    $role.Name = "Virtual Machine Operator"
    $role.IsCustom = $true
    $role.Description = "Can monitor, start, and restart virtual machines and virtual machines scale set."
    $role.AssignableScopes= @()
}

# Actions allowed by the role
$role.Actions = @()
$role.Actions.Add("Microsoft.Authorization/*/read")
$role.Actions.Add("Microsoft.Storage/*/read")
$role.Actions.Add("Microsoft.Network/*/read")
$role.Actions.Add("Microsoft.Compute/*/read")
$role.Actions.Add("Microsoft.Compute/virtualMachines/start/action")
$role.Actions.Add("Microsoft.Compute/virtualMachines/powerOff/action")
$role.Actions.Add("Microsoft.Compute/virtualMachines/restart/action")
$role.Actions.Add("Microsoft.Compute/virtualMachines/deallocate/action")
$role.Actions.Add("Microsoft.Compute/virtualMachineScaleSets/start/action")
$role.Actions.Add("Microsoft.Compute/virtualMachineScaleSets/powerOff/action")
$role.Actions.Add("Microsoft.Compute/virtualMachineScaleSets/restart/action")
$role.Actions.Add("Microsoft.Compute/virtualMachineScaleSets/deallocate/action")
$role.Actions.Add("Microsoft.Compute/virtualMachineScaleSets/virtualMachines/start/action")
$role.Actions.Add("Microsoft.Compute/virtualMachineScaleSets/virtualMachines/powerOff/action")
$role.Actions.Add("Microsoft.Compute/virtualMachineScaleSets/virtualMachines/restart/action")
$role.Actions.Add("Microsoft.Compute/virtualMachineScaleSets/virtualMachines/deallocate/action")
$role.Actions.Add("Microsoft.ClassicCompute/virtualMachines/downloadRemoteDesktopConnectionFile/action")
$role.Actions.Add("Microsoft.Resources/subscriptions/resourceGroups/read")
$role.Actions.Add("Microsoft.Resources/subscriptions/resourceGroups/resources/read")
$role.Actions.Add("Microsoft.Insights/alertRules/*")
$role.Actions.Add("Microsoft.Insights/diagnosticSettings/*")
$role.Actions.Add("Microsoft.OperationalInsights/workspaces/search/action")
$role.Actions.Add("Microsoft.Support/*")


# Subscriptions to which the role has permissions
$role.AssignableScopes.Clear()
ForEach ($vsub in $subscriptions) {
    $SubscriptionId = $vsub.SubscriptionID
    if ($vsub.State -eq "Enabled") {
        $role.AssignableScopes.Add("/subscriptions/$($SubscriptionId)")
    }
}

# Save/update the rol
if ($new) {
    New-AzRoleDefinition -Role $role
} else {
    Set-AzRoleDefinition -Role $role
}

# Wait 30 seconds for Azure to internally synchronize the new role for the next call.
Write-Output "Wainting 30 seconds for Azure internal sync..."
Start-Sleep -Seconds 30

# Assign rol reader and Virtual Machine Operator  to each subscription
ForEach ($vsub in $subscriptions) {
    $SubscriptionId = $vsub.SubscriptionID

    # Add permissions to the client
    if ($vsub.State -eq "Enabled") {
        if (!(Get-AzRoleAssignment -RoleDefinitionName "Reader" -ObjectId $compassInventoryServicePrincipal.Id -Scope "/subscriptions/$($SubscriptionId)")) {
            New-AzRoleAssignment -RoleDefinitionName "Reader" -ObjectId $compassInventoryServicePrincipal.Id -Scope "/subscriptions/$($SubscriptionId)"
        }
        if (!(Get-AzRoleAssignment -RoleDefinitionName $role.Name -ObjectId $compassInventoryServicePrincipal.Id -Scope "/subscriptions/$($SubscriptionId)")) {
            New-AzRoleAssignment -RoleDefinitionName $role.Name -ObjectId $compassInventoryServicePrincipal.Id -Scope "/subscriptions/$($SubscriptionId)"
        }
    }

}
Step 3: Permissions on subscriptions
After you have allowed the SSMCM application to access the directory, and created the role for SSMCM, you need to give permissions to each subscription individually. To do this, we must add the "Reader" and "Virtual Machine Operator" roles to the SSMCM user on each subscription:
- Select each subscription
- Select "Access control (IAM)"
- Rol Reader (to allow subscription inventory)
- Add -> Add role assignment
- In the field "Role", select "Reader"
- In the field "Assign access to", select "Azure AD user, group or service principal"
- In the field "Select", Select or type "SSMCM - Inventory", and select the only item resulting from the search
- Pulse "Save"
- For the "Virtual Machine Operator" role, follow the same procedure as above, but selecting this role instead of "Reader"
It will also be necessary to ensure that the "CompassRole" role contains the corresponding subscription ID in the AssignableScopes.
Bulk execution
It is possible to perform all these steps (role creation, assignment of permissions, etc.) in an automated way, using the next script, for example, running it from the Azure Cloud Shell or from any console with Powershell correctly configured:
Invoke-WebRequest -Uri "https://meikai.cloud/static/help/integrations/AzureIntegrationPS726Core.ps1" -OutFile "~/AzureIntegrationPS726Core.ps1"
~AzureIntegrationPS726Core.ps1
Info
The previous script is ready to run as many times as needed, regardless of whether the role already exists or not, or whether new subscriptions have been created.
Audit role
The process to create the audit role is very similar to the previous one, the following steps must be followed:
- Integrate the "SSMCM Inventory" application into the Azure directory
- Subscription permissions
Step 1: Integrate your application into your Azure directory
-
Visit URL https://login.microsoftonline.com/TENANT_DOMAIN.onmicrosoft.com/adminconsent?client_id=2f734312-2ccf-4c27-8658-c4a1bb937ef1&state=468466576&redirect_uri=http://localhost:3000 (replacing TENANT_DOMAIN with the corresponding domain) using a user with administrator permissions in the directory; This domain data can be viewed in the directory picker at the top right of the Azure portal:
-
Azure will ask if you want to allow access to the application; Accept it.
-
You will be redirected to http://localhost:3000, that will give error; This is normal, although permissions will have been granted successfully.
Step 2: Permissions on subscriptions
After you have allowed the SSMCM application to access the directory, and created the role for SSMCM, you need to give permissions to each subscription individually. To do this, we must add the "Reader" role to the SSMCM application in each subscription:
- Select each subscription
- Select "Access control (IAM)"
- Role Reader (to allow subscription inventory)
- Add -> Add role assignment
- In the "Role" field, select "Reader"
- In the "Assign access to" field, select "Azure AD user, group or service principal"
- In the "Select" field, select or type "SSMCM - Inventory", and select the only item resulting from the search
- Press "Save"
Integration in SSMCM
Finally, it is necessary to integrate the directory (tenant) in SSMCM. By integrating the directory, and not directly the subscription, SSMCM will automatically discover all subscriptions under that directory to which access has been granted.
For this, within SSMCM, we will go to the "Azure tenants" section, in the administration section (nut button). There we can see the list of tenants currently configured. We can add a new tenant by pressing the add button, and filling in the corresponding data.
In the next inventory update, SSMCM will automatically discover the subscriptions it has permission to and add them to its database, then taking the corresponding inventory.
If you do not want to wait for the auto-discovery of subscriptions, you can add them manually, or force the discovery of subscriptions from the "Maintenance" section.